.png)
.png)
Project 4 - Light Show
Components


Build
Step 1
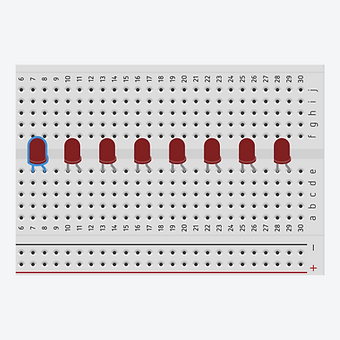
Connect the 8 LEDs to the breadboard with the longer lead (+) to the right. Leave one row between each LED.

Step 2
Bend the leads of eight 470Ω resistors into "U" shapes and add to the breadboard so that one resistor lead is in the same row as the "-" lead for each LED and the other resistor lead is in the negative sidebar of the breadboard.

Step 3
Connect a wire from the breadboard negative sidebar to one of the GND pins on the main board. For each LED connect a wire from the breadboard row with the "+" lead of a LED to pins 13 through 6. Plug the USB cable in to the main board.

Step 4
Connect the USB cable to the computer
Step 5
Find and open the Arduino application. Remember to select your board from the tools > port menu
Code
Copy the code to the right and then open the Arduino application.
Delete all of the text that appears and then paste in this code that you have copied.
1.
2.
3.
4.
5.
6.
7.
8.
9.
10.
11.
12.
13.
14.
15.
16.
17.
18.
19.
20.
21.
22.
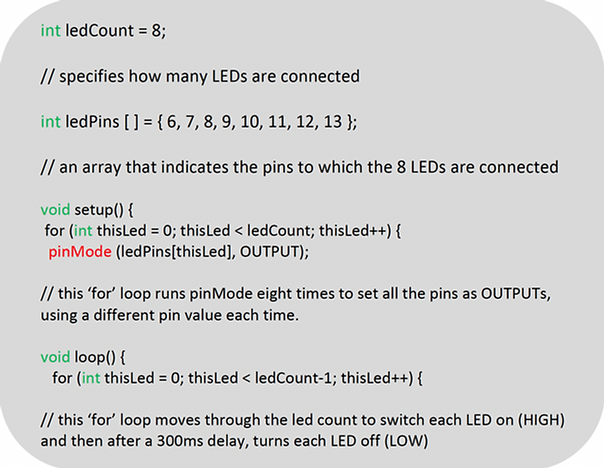
int ledCount = 8;
int ledPins [] = { 6, 7, 8, 9, 10, 11, 12, 13 };
int ledDelay = 300;
void setup() {
for (int thisLed = 0; thisLed < ledCount; thisLed++) {
pinMode (ledPins[thisLed], OUTPUT);
}
}
void loop() {
for (int thisLed = 0; thisLed < ledCount-1; thisLed++) {
digitalWrite(ledPins[thisLed], HIGH);
delay(ledDelay);
digitalWrite(ledPins[thisLed], LOW);
}
for (int thisLed = ledCount-1; thisLed > 0; thisLed--) {
digitalWrite(ledPins[thisLed], HIGH);
delay(ledDelay);
digitalWrite(ledPins[thisLed], LOW);
}
}
Click on the arrow shown in white to transfer the code to the Arduino Uno. You will need to give your sketch (program) a name. If the code is correct, the program will begin to run as soon as the code has transferred.

Explanation
This program could be written as identical consecutive commands for each led in the row but this is not the most efficient way to write this code. Instead, this program uses arrays and a "for" loop. The first 'for' loops sets the pins in the array as OUTPUTs. The second 'for' loop counts up through the LEDs, switching them on then off for 300ms. The second 'for' loop counts down through the LEDs, switching then on and off for 300ms.
Extension: Try adjusting the number and colour of LEDs in the circuit. For an even greater challenge, try and change to pattern of the LEDs by changing the order of the numbers in the array. Finally, try and use just one 'for' loop to produce the original pattern of the LEDs (hint: repeat pin numbers in the array).
Videos
Virtual Build
Physical Build
Knowledge Base - arrays & "for" loop
Arrays can be thought of as a list which stores a collection of data of the same variable type. Instead of having to refer to every item on a list one by one, the array can be defined as 'ledPins' and then the program can just refer to the 'list' (ledPins), instead of each piece of data individually.
For loops are used when you have a block of text you want to repeat a fixed number of times. This is different to the 'while' loop which repeats code indefinitely as long as certain conditions are met.
The 'for' loop in this program has three arguments:
for (int thisLed = 0; thisLed < ledCount-1; thisLed++)
The first argument (int thisLed = 0) passed to the for loop sets the name of the variable that will be used as the "loop counter". Here, the loop counter is a number called "thisLed" and it's given a starting value of 0.
The second argument sets the terminating condition so the 'for' loop knows when it should stop running. Is this program, the loop will keep running until the value of 'thisLed' is equal to the value of the ledCount-1 (ledCount-1 is used as the positions in an array start at 0, so LED number 8 is in the 7th position.)
The third argument is an action that the loop will perform each time it runs. The "++" operator is a shorthand way of saying to take a variable and add 1 to it. This means the "thisLed" variable will get bigger by 1 every time the loop executes. Likewise, the "--" operator means the "thisLed" variable will get smaller by 1 each time the loop executes.
When all three arguments are combined in the for loop, the following sequence occurs:
The program starts with a variable with a value of 0, increases that value by each time it runs, and when the value reaches 8, it stops.