![Arduino Components (3).png](https://static.wixstatic.com/media/9c50aa_4609ee34746743f9a8ca77e04f82e86e~mv2.png/v1/crop/x_0,y_180,w_1080,h_720/fill/w_87,h_58,al_c,q_85,usm_0.66_1.00_0.01,enc_avif,quality_auto/Arduino%20Components%20(3).png)
![Arduino Components (2).png](https://static.wixstatic.com/media/9c50aa_5cc5ee21ee5243f288700fbe4bc79050~mv2.png/v1/crop/x_0,y_201,w_1080,h_678/fill/w_87,h_58,al_c,q_85,usm_0.66_1.00_0.01,enc_avif,quality_auto/Arduino%20Components%20(2).png)
![Arduino Components (3).png](https://static.wixstatic.com/media/9c50aa_4609ee34746743f9a8ca77e04f82e86e~mv2.png/v1/crop/x_0,y_180,w_1080,h_720/fill/w_87,h_58,al_c,q_85,usm_0.66_1.00_0.01,enc_avif,quality_auto/Arduino%20Components%20(3).png)
Project 5 - A Song
Components
![Brain Board.png](https://static.wixstatic.com/media/9c50aa_efb70623ad9849008e68f7f4b197d684~mv2.png/v1/fill/w_177,h_177,al_c,q_85,usm_0.66_1.00_0.01,enc_avif,quality_auto/Brain%20Board.png)
![Buzzer.png](https://static.wixstatic.com/media/9c50aa_d132577217d2458ea62a1917776ef2fd~mv2.png/v1/fill/w_177,h_177,al_c,q_85,usm_0.66_1.00_0.01,enc_avif,quality_auto/Buzzer.png)
![2 x female male wires.png](https://static.wixstatic.com/media/9c50aa_ee8546a3e15d40fc9a3cc2fe71def07a~mv2.png/v1/fill/w_177,h_177,al_c,q_85,usm_0.66_1.00_0.01,enc_avif,quality_auto/2%20x%20female%20male%20wires.png)
![USB AB.png](https://static.wixstatic.com/media/9c50aa_9520d7d0c83c48e191f6ccdc420034d4~mv2.png/v1/fill/w_177,h_177,al_c,q_85,usm_0.66_1.00_0.01,enc_avif,quality_auto/USB%20AB.png)
![Computer.png](https://static.wixstatic.com/media/9c50aa_5eea7f79bbb5420ab6b95c66de965eef~mv2.png/v1/fill/w_177,h_177,al_c,q_85,usm_0.66_1.00_0.01,enc_avif,quality_auto/Computer.png)
Build
![Arduino Components (1).png](https://static.wixstatic.com/media/9c50aa_97de5720dfb24edb8b90f7e6591ac67d~mv2.png/v1/fill/w_340,h_340,al_c,q_85,usm_0.66_1.00_0.01,enc_avif,quality_auto/Arduino%20Components%20(1).png)
Step 1
Connect the piezo to the main board. The short piezo lead (-) goes into GND. The long piezo lead (+) goes into pin 8.
![Project 1 Step 3.png](https://static.wixstatic.com/media/9c50aa_a150ae01722f4651b4d902b8f75e96fe~mv2.png/v1/fill/w_340,h_340,al_c,q_85,usm_0.66_1.00_0.01,enc_avif,quality_auto/Project%201%20Step%203.png)
Step 3
Connect the USB cable to the computer
![Arduino Components.png](https://static.wixstatic.com/media/9c50aa_973ddb74e7c34c9688eb4fc9c7f3bd14~mv2.png/v1/fill/w_340,h_340,al_c,q_85,usm_0.66_1.00_0.01,enc_avif,quality_auto/Arduino%20Components.png)
Step 2
Plug the USB cable in to the main board.
![Project 1 Step 4.png](https://static.wixstatic.com/media/9c50aa_3d3d58dba9a24ed38f66e8dcf789adcc~mv2.png/v1/fill/w_340,h_340,al_c,q_85,usm_0.66_1.00_0.01,enc_avif,quality_auto/Project%201%20Step%204.png)
Step 4
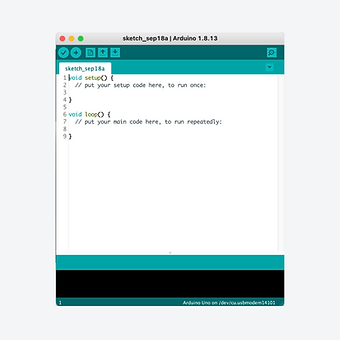
Find and open the Arduino application. Remember to select your board from the tools > port menu
Code
Copy the code to the right and then open the Arduino application.
Delete all of the text that appears and then paste in this code that you have copied.
1.
2.
3.
4.
5.
6.
7.
8.
9.
10.
11.
12.
13.
14.
15.
16.
17.
18.
19.
20.
21.
22.
23.
24.
int piezo = 8;
int duration = 250;
int notes[] =
{261, 293, 329, 349, 392, 440, 493, 523, 587, 659, 698, 783, 880};
void setup()
{
pinMode(piezo, OUTPUT);
}
void loop()
{
for (int i = 0; i < 13; i++)
{
tone(piezo, notes[i], duration);
delay(duration);
}
for (int i = 11; i > 0; i--)
{
tone(piezo, notes[i], duration);
delay(duration);
}
}
Click on the arrow shown in white to transfer the code to the Arduino Uno. You will need to give your sketch (program) a name. If the code is correct, the program will begin to run as soon as the code has transferred.
![Flash Code to brain board.png](https://static.wixstatic.com/media/9c50aa_7573b63a4759478e86e668fb43588ed9~mv2.png/v1/fill/w_426,h_340,al_c,q_85,usm_0.66_1.00_0.01,enc_avif,quality_auto/Flash%20Code%20to%20brain%20board.png)
Explanation
This project builds on the last one by using arrays and 'for' loops again. This time, however, the array and 'for' loop are used to make a song by having the piezo produce frequencies equating to specific notes.
![Project 5 code.png](https://static.wixstatic.com/media/9c50aa_657f3cafef4f40df80f2255b564a1341~mv2.png/v1/crop/x_3,y_0,w_1845,h_1198/fill/w_591,h_384,al_c,q_85,usm_0.66_1.00_0.01,enc_avif,quality_auto/Project%205%20code.png)
Extension: Write a program to play 'Mary had a little lamb' or create a new ring tone for your phone.
Videos
Digital Build
Physical Build
Knowledge Base - notes & tone function
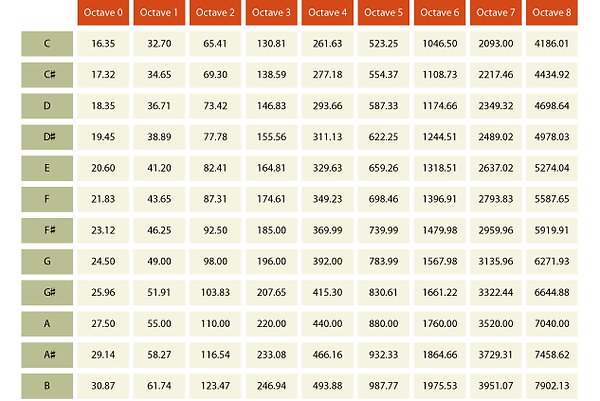
All musical notes have a unique frequency, as shown in the diagram below. The piezo is able to be programmed to produce notes of a particular frequency. To play a repeating pattern of notes, an array is an ideal way to list the notes to be played.
![Freq-Chart.png](https://static.wixstatic.com/media/9c50aa_0fa29c284edf4e5799a63ce86107870a~mv2.png/v1/crop/x_0,y_43,w_634,h_423/fill/w_600,h_400,al_c,q_85,usm_0.66_1.00_0.01,enc_avif,quality_auto/Freq-Chart.png)
The 'tone' function sends a signal to the buzzer to create a sound at a certain frequency. There are three parameters in the tone function.
The first parameter (piezo) defines the digital pin to which the piezo is connected.
The second parameter (notes[i]) identifies the frequency of the tones required.
The third parameter determines the duration of each tone in milliseconds.
When playing tones one after the other, a delay () is needed after the tone () with a matching duration.